
Main Menu
- Welcome to cBrandon Community.


Recent posts
#41
Raspberry Pi / Changing the Clock Format via ...
Last post by branx86 - August 20, 2026, 09:30:26 PMChanging the Clock Format via Desktop GUITurn on your Raspberry Pi and open the desktop environment.Move your mouse to the clock display in the upper-right corner of the screen.Right-click the clock.Select Digital Clock Settings (or Configure Plugin) from the menu.Look for the field labeled Clock Format or Time Format.Clear the existing text and type %I:%M %p to show a 12-hour format with AM/PM and no seconds, or %r if you want the seconds to tick.Click OK or apply to save your changes
#42
General Discussion / Reset Maintenace Lexus GX460
Last post by branx86 - August 16, 2026, 09:06:06 PM #43
Raspberry Pi / Put Snapmaker U1 3D printer on...
Last post by branx86 - July 30, 2026, 09:15:39 PMDownload the Guide Uses a Raspberry PI and USB to Ethernet adapter
Tested on Raspberry Pi 3B+/4/5
Tested on Raspberry Pi 3B+/4/5
#44
Raspberry Pi / Bridge 5Ghz to ethernet (2.4Gh...
Last post by branx86 - July 30, 2026, 08:56:24 PMSetup Instructions
1. Connect the Hardware:
o Connect your Raspberry Pi 4 to your home's 5 GHz Wi-Fi network.
o Plug a standard Ethernet cable into the built-in Ethernet port (eth0) on the Pi 4.
o Connect the other end of that cable to a USB-to-Ethernet adapter.
o Plug that USB adapter directly into an open USB host port on the Snapmaker U1 controller box. [1, 2, 3]
2. Configure the Pi Bridge Software:
o Open the Raspberry Pi terminal.
o Install the network bridging tools: sudo apt install bridge-utils
o To automatically forward all incoming 5 GHz traffic from wlan0 straight to the Ethernet port eth0, activate IP forwarding by editing the sysctl file:
Bash:
sudo sysctl -w net.ipv4.ip_forward=1
Configure an IP masquerade ruleset using iptables to share the connection:
bash
sudo iptables -t nat -A POSTROUTING -o wlan0 -j MASQUERADE
sudo iptables -A FORWARD -i wlan0 -o eth0 -m state --state RELATED,ESTABLISHED -j ACCEPT
sudo iptables -A FORWARD -i eth0 -o wlan0 -j ACCEPT
3. Verify on Snapmaker:
o Reboot your Snapmaker U1.
o Navigate to the touchscreen settings network panel. The printer will bypass wireless scans and automatically pull a hardwired local IP address generated by your Raspberry Pi router bridge.
Part 1: Make Firewall Routing Permanent on the Pi
By default, the iptables rules you entered are saved in active RAM and flush upon reboot. To make them persistent, you will use iptables-persistent: [1, 2]
1. Run the installation package command:
bash
sudo apt install iptables-persistent -y
2. During the installation, a blue configuration prompt will appear on your screen. Select Yes when it asks to save current IPv4 rules.
3. If you ever change or update your network routing rules in the future, save over the persistent configuration manually using:
bash
4. sudo netfilter-persistent save
CONNECTION
Router -->(5Ghz)--> Raspberry Pi 3B+,4,5 wLan0 ->eth0 ---> Ethernet cable ---> USB to Ethernet Adapter -->plugged into USB A port of the Snapmaker U1 3d Printer
1. Connect the Hardware:
o Connect your Raspberry Pi 4 to your home's 5 GHz Wi-Fi network.
o Plug a standard Ethernet cable into the built-in Ethernet port (eth0) on the Pi 4.
o Connect the other end of that cable to a USB-to-Ethernet adapter.
o Plug that USB adapter directly into an open USB host port on the Snapmaker U1 controller box. [1, 2, 3]
2. Configure the Pi Bridge Software:
o Open the Raspberry Pi terminal.
o Install the network bridging tools: sudo apt install bridge-utils
o To automatically forward all incoming 5 GHz traffic from wlan0 straight to the Ethernet port eth0, activate IP forwarding by editing the sysctl file:
Bash:
sudo sysctl -w net.ipv4.ip_forward=1
Configure an IP masquerade ruleset using iptables to share the connection:
bash
sudo iptables -t nat -A POSTROUTING -o wlan0 -j MASQUERADE
sudo iptables -A FORWARD -i wlan0 -o eth0 -m state --state RELATED,ESTABLISHED -j ACCEPT
sudo iptables -A FORWARD -i eth0 -o wlan0 -j ACCEPT
3. Verify on Snapmaker:
o Reboot your Snapmaker U1.
o Navigate to the touchscreen settings network panel. The printer will bypass wireless scans and automatically pull a hardwired local IP address generated by your Raspberry Pi router bridge.
Part 1: Make Firewall Routing Permanent on the Pi
By default, the iptables rules you entered are saved in active RAM and flush upon reboot. To make them persistent, you will use iptables-persistent: [1, 2]
1. Run the installation package command:
bash
sudo apt install iptables-persistent -y
2. During the installation, a blue configuration prompt will appear on your screen. Select Yes when it asks to save current IPv4 rules.
3. If you ever change or update your network routing rules in the future, save over the persistent configuration manually using:
bash
4. sudo netfilter-persistent save
CONNECTION
Router -->(5Ghz)--> Raspberry Pi 3B+,4,5 wLan0 ->eth0 ---> Ethernet cable ---> USB to Ethernet Adapter -->plugged into USB A port of the Snapmaker U1 3d Printer
#45
Raspberry Pi / DIY Flight Radar_ ESP32
Last post by branx86 - July 28, 2026, 12:52:21 AMLinks:
Flash firmware-
https://techtalkies.github.io/flash.html
Source code repo-
https://github.com/TechTalkies/flight-radar
Secondary repo-
https://github.com/TechTalkies/YouTube/tree/main/108_Flight_radar
Open Sky Network-
https://opensky-network.org/
Features
Live aircraft tracking
Smooth radar sweep animation
Aircraft movement prediction between updates
Rotary encoder navigation
Detailed aircraft information screen
Multiple aircraft color coding
Runs entirely on an ESP32-S3
Simple and affordable hardware
Hardware Used
ESP32-S3 Zero
240x240 Round GC9A01 Display
Rotary Encoder
3D printed parts
Credits
This project is based on the excellent Micro Radar project by Anthony Sturdy and has been adapted and simplified for inexpensive ESP32 hardware.
Original repo: https://github.com/AnthonySturdy/micro-radar
#ESP32 #FlightRadar #OpenSky #GC9A01 #ESP32S3 #DIYElectronics #MakerProject #Arduino #TechTalkies #EmbeddedSystems
#47
Linux Fixes / Linux Docker
Last post by branx86 - July 26, 2026, 08:13:50 PMInstall Docker CentOS -
Setup the repository:
sudo dnf install -y yum-utils
sudo dnf config-manager --add-repo https://download.docker.com/linux/centos/docker-ce.repo
Install Docker Engine:
sudo dnf install docker-ce docker-ce-cli containerd.io docker-buildx-plugin docker-compose-plugin -y
Boot and run:
sudo systemctl enable --now docker
Verify and Configure Permissions:
sudo usermod -aG docker $USER
newgrp docker
docker ps - Shows docker images running
docker kill <container_id_or_name> -Used to stop images
docker image prune # Remove old images
docker rmi <image_id> or docker image rm <image_name>:<tag> -Remove docker image
Setup the repository:
sudo dnf install -y yum-utils
sudo dnf config-manager --add-repo https://download.docker.com/linux/centos/docker-ce.repo
Install Docker Engine:
sudo dnf install docker-ce docker-ce-cli containerd.io docker-buildx-plugin docker-compose-plugin -y
Boot and run:
sudo systemctl enable --now docker
Verify and Configure Permissions:
sudo usermod -aG docker $USER
newgrp docker
docker ps - Shows docker images running
docker kill <container_id_or_name> -Used to stop images
docker image prune # Remove old images
docker rmi <image_id> or docker image rm <image_name>:<tag> -Remove docker image
#48
Raspberry Pi / Put ChatGPT on your Meshtastic...
Last post by branx86 - July 25, 2026, 12:24:09 AMUse the TXT document to install Meshtastic Ai -Bot
Worked on Raspberry Pi 3b+ with 64 Bit OS
Install dependencies: pip install meshtastic openai pubsub
Python Script
import meshtastic
import meshtastic.serial_interface
from pubsub import pub
from openai import OpenAI
import time
# ==== CONFIG ====
OPENAI_API_KEY = "your_openai_api_key_here"
MODEL = "gpt-4o-mini" # fast + cheap model
CHANNEL_INDEX = 0 # default Meshtastic channel
# Initialize OpenAI client
client = OpenAI(api_key=OPENAI_API_KEY)
# Connect to Meshtastic (USB)
interface = meshtastic.serial_interface.SerialInterface()
print("Connected to Meshtastic!")
# ==== CHATGPT FUNCTION ====
def ask_chatgpt(prompt):
try:
response = client.chat.completions.create(
model=MODEL,
messages=[
{"role": "system", "content": "You are a helpful assistant. Keep responses short (under 200 characters)."},
{"role": "user", "content": prompt}
]
)
return response.choices
return f"Error: {str(e)}"
# ==== MESSAGE HANDLER ====
def on_receive(packet, interface):
try:
if 'decoded' not in packet:
return
text = packet['decoded'].get('text', '')
sender = packet.get('fromId', 'unknown')
if not text:
return
print(f"Received: {text} from {sender}")
# Check for "/" command
if text.startswith("/"):
query = text[1:].strip()
if not query:
return
print(f"Querying ChatGPT: {query}")
reply = ask_chatgpt(query)
print(f"Reply: {reply}")
# Send back to mesh
interface.sendText(
text=reply,
channelIndex=CHANNEL_INDEX
)
except Exception as e:
print(f"Error handling message: {e}")
# Subscribe to Meshtastic receive events
pub.subscribe(on_receive, "meshtastic.receive")
# ==== KEEP RUNNING ====
try:
while True:
time.sleep(1)
except KeyboardInterrupt:
interface.close()
print("Disconnected.")
Optional Improvements:
if packet.get('fromId') == interface.myInfo.my_node_num:
return
Limit response length (important for LoRa)
Meshtastic payloads are small (~200 chars), so trim:
reply = reply[:200]
Add command types:
/weather Dallas
/help
/status
Worked on Raspberry Pi 3b+ with 64 Bit OS
Install dependencies: pip install meshtastic openai pubsub
Python Script
import meshtastic
import meshtastic.serial_interface
from pubsub import pub
from openai import OpenAI
import time
# ==== CONFIG ====
OPENAI_API_KEY = "your_openai_api_key_here"
MODEL = "gpt-4o-mini" # fast + cheap model
CHANNEL_INDEX = 0 # default Meshtastic channel
# Initialize OpenAI client
client = OpenAI(api_key=OPENAI_API_KEY)
# Connect to Meshtastic (USB)
interface = meshtastic.serial_interface.SerialInterface()
print("Connected to Meshtastic!")
# ==== CHATGPT FUNCTION ====
def ask_chatgpt(prompt):
try:
response = client.chat.completions.create(
model=MODEL,
messages=[
{"role": "system", "content": "You are a helpful assistant. Keep responses short (under 200 characters)."},
{"role": "user", "content": prompt}
]
)
return response.choices
- .message.content.strip()
return f"Error: {str(e)}"
# ==== MESSAGE HANDLER ====
def on_receive(packet, interface):
try:
if 'decoded' not in packet:
return
text = packet['decoded'].get('text', '')
sender = packet.get('fromId', 'unknown')
if not text:
return
print(f"Received: {text} from {sender}")
# Check for "/" command
if text.startswith("/"):
query = text[1:].strip()
if not query:
return
print(f"Querying ChatGPT: {query}")
reply = ask_chatgpt(query)
print(f"Reply: {reply}")
# Send back to mesh
interface.sendText(
text=reply,
channelIndex=CHANNEL_INDEX
)
except Exception as e:
print(f"Error handling message: {e}")
# Subscribe to Meshtastic receive events
pub.subscribe(on_receive, "meshtastic.receive")
# ==== KEEP RUNNING ====
try:
while True:
time.sleep(1)
except KeyboardInterrupt:
interface.close()
print("Disconnected.")
Optional Improvements:
if packet.get('fromId') == interface.myInfo.my_node_num:
return
Limit response length (important for LoRa)
Meshtastic payloads are small (~200 chars), so trim:
reply = reply[:200]
Add command types:
/weather Dallas
/help
/status
#49
General Discussion / ASK ChatGPT to remove your dig...
Last post by branx86 - July 24, 2026, 10:03:17 PMhttps://www.netnerds.com/prompts
Search the internet for everything you can find about me (First Last name City,State zip) every data broker and people search site that is exposing my personal information and give me the exact opt out link for each one.
Write me the exact removal request to send to each sites
Click the Plus and click agent Must be a paid user go to every one those site and submit the opt out removal request
Recheck every site every week and resubmit any removal request that gets ignored until completely gone
Search the internet for everything you can find about me (First Last name City,State zip) every data broker and people search site that is exposing my personal information and give me the exact opt out link for each one.
Write me the exact removal request to send to each sites
Click the Plus and click agent Must be a paid user go to every one those site and submit the opt out removal request
Recheck every site every week and resubmit any removal request that gets ignored until completely gone
#50
HAM Radio / RTLSDR Over iPhone IOS
Last post by branx86 - July 23, 2026, 09:48:53 AM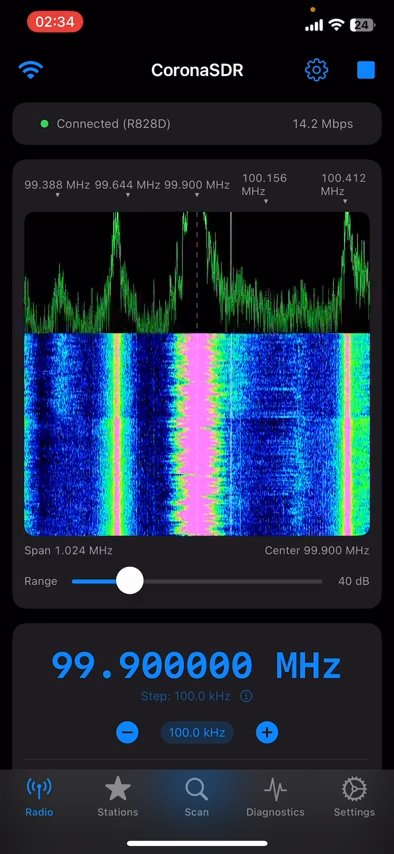
USEs CoronaSDR
Manual setup on Pi Zero 2:
***
sudo apt update && sudo apt install -y rtl-sdr libusb-1.0-0-dev
rtl_test -t
rtl_tcp -a 0.0.0.0 -p 1234
***
Automatic setup:
***
cat <<EOF | sudo tee /etc/systemd/system/rtlsdr.service
[Unit]
Description=RTL-SDR Server
After=network.target
[Service]
ExecStart=/usr/bin/rtl_tcp -a 0.0.0.0 -p 1234
Restart=always
User=pi
[Install]
WantedBy=multi-user.target
EOF
sudo systemctl daemon-reload
sudo systemctl enable rtlsdr.service
sudo systemctl start rtlsdr.service
***
Attention: use proper power-supply for the usb port.