- Welcome to cBrandon Community.


Recent posts
#91
Windows Fixes / Check NIC speed CMD
Last post by branx86 - June 15, 2021, 07:56:11 AMcmd to check nic or wireless card speed
wmic nic where netEnabled=true get name, speed
in Powershell
Get-NetAdapter | select interfaceDescription, name, status, linkSpeed
wmic nic where netEnabled=true get name, speed
in Powershell
Get-NetAdapter | select interfaceDescription, name, status, linkSpeed
#92
Raspberry Pi / Raspberry Pi Email Server
Last post by branx86 - November 09, 2019, 11:31:10 AM #93
Linux Fixes / Create a crontab startup scrip...
Last post by branx86 - November 04, 2019, 10:44:14 AM1. Create script nano WhateverNameyouChoose.sh
2. Put the text below in the top of the script:
#!/bin/sh
# launcher.sh
# navigate to home directory, then to this directory, then execute python script, then back home
cd /
cd home/pi/bbt
sudo python bbt.py
cd /
3.Make script an executable: chmod 755 WhateverNameyouChoose.sh
4. crontab is a background (daemon) process that lets you execute scripts at specific times.
sudo crontab -e
To make script start at reboot: @reboot sh /home/pi/WhateverNameyouChoose.sh >/home/pi/logs/cronlog 2>&1
reboot should be working.
#94
Linux Fixes / Rsync to copy to another drive
Last post by branx86 - November 01, 2019, 08:01:00 AMrsync -aAXv --exclude={"/dev/*","/proc/*","/sys/*","/tmp/*","/run/*","/mnt/*","/media/*","/lost+found"} /* /mnt/bigdrive/BackupImages.1
#95
Windows Fixes / Safe mode windows 10
Last post by branx86 - October 04, 2019, 08:51:41 AMbcdedit /set {default} bootmenupolicy legacy
bcdedit /set {default} safeboot minimal
bcdedit /set {default} safeboot network
rstrui.exe to run roll back
bcdedit /set {default} safeboot minimal
bcdedit /set {default} safeboot network
rstrui.exe to run roll back
#96
General Discussion / Sonoff Light switch
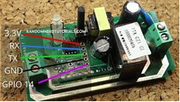
Last post by branx86 - August 08, 2019, 01:42:40 PMConnect wires to GPIO14 & Ground to Control for U.S. Light Switch

#97
Windows Fixes / Get Mac Address remotely
Last post by branx86 - July 23, 2019, 09:32:54 AMuse getmac /s ipaddress Exp. getmac /s 10.64.65.61
or ping address
then arp -a ipadress
IF it's a windows machine on the other end do " nbtstat -a remotecomputer "
or ping address
then arp -a ipadress
IF it's a windows machine on the other end do " nbtstat -a remotecomputer "
#98
Windows Fixes / Browser Favorite Locations
Last post by branx86 - July 11, 2019, 09:59:37 AMChrome Favorites Location:
Users\Name_OF_User\AppData\Local\Google\Chrome\User Data\Default
Internet Explorer Location:
C:\Users(username)\Favorites\
Firefox Location:
C:\Users\<Windows login/user name>\AppData\Roaming\Mozilla\Firefox\Profiles\<profile folder>
Safari Location:
C:\Documents and Settings\YourUsername\Application Data\Apple Computer\Safari\Bookmarks.plist
#99
Windows Fixes / Remove arrows from Icon's win1...
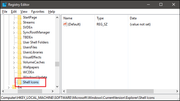
Last post by branx86 - June 13, 2019, 05:24:40 PMFirst open regedit
Then navigate HKEY_LOCAL_MACHINE\SOFTWARE\Microsoft\Windows\CurrentVersion\Explorer
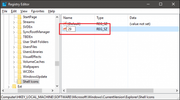
Next, you're going to create a new value inside the Shell Icons key. Right-click the Shell Icons folder icon and choose New > String Value. Name the new value 29.
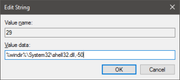
Now, you're going to modify that value. Double-click the new 29 value and type (or copy and paste) the following into the "Value data" box to remove arrows from shortcut icons: %windir%\System32\shell32.dll,-50
To put the arrows back just Delete the 29 key.
Then navigate HKEY_LOCAL_MACHINE\SOFTWARE\Microsoft\Windows\CurrentVersion\Explorer
Next, you're going to create a new value inside the Shell Icons key. Right-click the Shell Icons folder icon and choose New > String Value. Name the new value 29.
Now, you're going to modify that value. Double-click the new 29 value and type (or copy and paste) the following into the "Value data" box to remove arrows from shortcut icons: %windir%\System32\shell32.dll,-50
To put the arrows back just Delete the 29 key.
#100
Arduino / Arduino 16x16 LED Sign
Last post by branx86 - March 12, 2019, 09:34:10 PMUse Arduino 1.0 to program use the attachment to program ino and 16x16Scrolling Letters_Numbers to write messages.
IF you use Ardunio IDE 1.6.8
use settings:
Board "Arduino/Genuino UNO"
Programmer "AVRISP"
Serial Monitor Baud Rate "9600"
IF you use Ardunio IDE 1.6.8
use settings:
Board "Arduino/Genuino UNO"
Programmer "AVRISP"
Serial Monitor Baud Rate "9600"