News:

The Latest electronic and computer Tips that work!

Main Menu
Menu

Show posts

This section allows you to view all posts made by this member. Note that you can only see posts made in areas you currently have access to.

Show posts Menu

Topics - branx86

#101


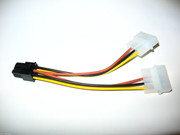
With the locking pin facing up on the PCIe connector all three pins are negative the two bottom pins are 12volts on each corner.


#102
1. Installing and Using the Wiring Pi Library     
  At raspberry prompt type:        git clone git://git.drogon.net/wiringPi
if you need git type:   apt-get install git-core
Then cd ~/wiringPi   and ./build
To check if installed type: gpio -v then gpio readall
Install Apache and PHP on the Pi with    apt-get install apache2 php5 libapache2-mod-php5
You might have to chmod -R 777 /var/www/html  to copy over the files  copy all the file in the Raspberry_web_Switch_control.zip to the web server folder /var/www/html
navigate to using a webrowser to the pi ip address and see if working.

in the index.php  change the  $i= 0; $i<1  1 =One Button on the screen or whatever number you want up to 8

button 0= Gpio pin 11


Credit to https://www.instructables.com/id/Simple-and-intuitive-web-interface-for-your-Raspbe/

#103
All Credit to http://johnbiehler.com/2016/06/05/monoprice-maker-select-mini-3d-printer/

For software, the manual recommends using Cura or Repetier. I like Cura so used that to prepare my files for printing. It should also work with Simplify 3D if you manually create a profile. I figure someone will ask for my Cura settings so here they are:


#104
Raspberry Pi / Motion .conf
March 07, 2018, 08:57:13 AM
# Rename this distribution example file to motion.conf
#
# This config file was generated by motion 3.2.12+git20140228


############################################################
# Daemon
############################################################

# Start in daemon (background) mode and release terminal (default: off)
daemon on

# File to store the process ID, also called pid file. (default: not defined)
process_id_file /var/run/motion/motion.pid

############################################################
# Basic Setup Mode
############################################################

# Start in Setup-Mode, daemon disabled. (default: off)
setup_mode off


# Use a file to save logs messages, if not defined stderr and syslog is used. (default: not defined)
;logfile /tmp/motion.log

# Level of log messages [1..9] (EMR, ALR, CRT, ERR, WRN, NTC, INF, DBG, ALL). (default: 6 / NTC)
log_level 6

# Filter to log messages by type (COR, STR, ENC, NET, DBL, EVT, TRK, VID, ALL). (default: ALL)
log_type all

###########################################################
# Capture device options
############################################################

# Videodevice to be used for capturing  (default /dev/video0)
# for FreeBSD default is /dev/bktr0
videodevice /dev/video0

# v4l2_palette allows to choose preferable palette to be use by motion
# to capture from those supported by your videodevice. (default: 17)
# E.g. if your videodevice supports both V4L2_PIX_FMT_SBGGR8 and
# V4L2_PIX_FMT_MJPEG then motion will by default use V4L2_PIX_FMT_MJPEG.
# Setting v4l2_palette to 2 forces motion to use V4L2_PIX_FMT_SBGGR8
# instead.
#
# Values :
# V4L2_PIX_FMT_SN9C10X : 0  'S910'
# V4L2_PIX_FMT_SBGGR16 : 1  'BYR2'
# V4L2_PIX_FMT_SBGGR8  : 2  'BA81'
# V4L2_PIX_FMT_SPCA561 : 3  'S561'
# V4L2_PIX_FMT_SGBRG8  : 4  'GBRG'
# V4L2_PIX_FMT_SGRBG8  : 5  'GRBG'
# V4L2_PIX_FMT_PAC207  : 6  'P207'
# V4L2_PIX_FMT_PJPG    : 7  'PJPG'
# V4L2_PIX_FMT_MJPEG   : 8  'MJPEG'
# V4L2_PIX_FMT_JPEG    : 9  'JPEG'
# V4L2_PIX_FMT_RGB24   : 10 'RGB3'
# V4L2_PIX_FMT_SPCA501 : 11 'S501'
# V4L2_PIX_FMT_SPCA505 : 12 'S505'
# V4L2_PIX_FMT_SPCA508 : 13 'S508'
# V4L2_PIX_FMT_UYVY    : 14 'UYVY'
# V4L2_PIX_FMT_YUYV    : 15 'YUYV'
# V4L2_PIX_FMT_YUV422P : 16 '422P'
# V4L2_PIX_FMT_YUV420  : 17 'YU12'
#
v4l2_palette 17

# Tuner device to be used for capturing using tuner as source (default /dev/tuner0)
# This is ONLY used for FreeBSD. Leave it commented out for Linux
# The video input to be used (default: -1)
# Should normally be set to 0 or 1 for video/TV cards, and -1 for USB cameras
input -1

# The video norm to use (only for video capture and TV tuner cards)
# Values: 0 (PAL), 1 (NTSC), 2 (SECAM), 3 (PAL NC no colour). Default: 0 (PAL)
norm 1

# The frequency to set the tuner to (kHz) (only for TV tuner cards) (default: 0)
frequency 0

# Rotate image this number of degrees. The rotation affects all saved images as
# well as movies. Valid values: 0 (default = no rotation), 90, 180 and 270.
rotate 0

# Image width (pixels). Valid range: Camera dependent, default: 352
#width 320
width 640
# Image height (pixels). Valid range: Camera dependent, default: 288
#height 240
height 480
# Maximum number of frames to be captured per second.
# Valid range: 2-100. Default: 100 (almost no limit).
framerate 100

# Minimum time in seconds between capturing picture frames from the camera.
# Default: 0 = disabled - the capture rate is given by the camera framerate.
# This option is used when you want to capture images at a rate lower than 2 per second.
minimum_frame_time 0

# URL to use if you are using a network camera, size will be autodetected (incl http:// ftp:// mjpg:// r$
# Must be a URL that returns single jpeg pictures or a raw mjpeg stream. Default: Not defined
; netcam_url value

# Username and password for network camera (only if required). Default: not defined
# Syntax is user:password
; netcam_userpass value

# The setting for keep-alive of network socket, should improve performance on compatible net cameras.
# off:   The historical implementation using HTTP/1.0, closing the socket after each http request.
# force: Use HTTP/1.0 requests with keep alive header to reuse the same connection.
# on:    Use HTTP/1.1 requests that support keep alive as default.
# Default: off
netcam_keepalive off

# URL to use for a netcam proxy server, if required, e.g. "http://myproxy".
# If a port number other than 80 is needed, use "http://myproxy:1234".
# Default: not defined
; netcam_proxy value

# Set less strict jpeg checks for network cameras with a poor/buggy firmware.
# Default: off
netcam_tolerant_check off

# Let motion regulate the brightness of a video device (default: off).
# The auto_brightness feature uses the brightness option as its target value.
# If brightness is zero auto_brightness will adjust to average brightness value 128.
# Only recommended for cameras without auto brightness
auto_brightness off

# Set the initial brightness of a video device.
# If auto_brightness is enabled, this value defines the average brightness level
# which Motion will try and adjust to.
# Valid range 0-255, default 0 = disabled
brightness 0

# Set the contrast of a video device.
# Valid range 0-255, default 0 = disabled
contrast 0

# Set the saturation of a video device.
# Valid range 0-255, default 0 = disabled
saturation 0

# Set the hue of a video device (NTSC feature).
# Valid range 0-255, default 0 = disabled
hue 0

############################################################
# Round Robin (multiple inputs on same video device name)
############################################################

# Number of frames to capture in each roundrobin step (default: 1)
roundrobin_frames 1

# Number of frames to skip before each roundrobin step (default: 1)
roundrobin_skip 1

# Try to filter out noise generated by roundrobin (default: off)
switchfilter off


############################################################
# Motion Detection Settings:
############################################################

# Threshold for number of changed pixels in an image that
# triggers motion detection (default: 1500)
threshold 1500

# Automatically tune the threshold down if possible (default: off)
threshold_tune off

# Noise threshold for the motion detection (default: 32)
noise_level 32

# Automatically tune the noise threshold (default: on)
noise_tune on

# Despeckle motion image using (e)rode or (d)ilate or (l)abel (Default: not defined)
# Recommended value is EedDl. Any combination (and number of) of E, e, d, and D is valid.
# (l)abeling must only be used once and the 'l' must be the last letter.
# Comment out to disable
despeckle_filter EedDl

# Detect motion in predefined areas (1 - 9). Areas are numbered like that:  1 2 3
# A script (on_area_detected) is started immediately when motion is         4 5 6
# detected in one of the given areas, but only once during an event.        7 8 9
# One or more areas can be specified with this option. Take care: This option
# does NOT restrict detection to these areas! (Default: not defined)
; area_detect value

# PGM file to use as a sensitivity mask.
# Full path name to. (Default: not defined)
; mask_file value

# Dynamically create a mask file during operation (default: 0)
# Adjust speed of mask changes from 0 (off) to 10 (fast)
smart_mask_speed 0

# Ignore sudden massive light intensity changes given as a percentage of the picture
# area that changed intensity. Valid range: 0 - 100 , default: 0 = disabled
lightswitch 0

# Picture frames must contain motion at least the specified number of frames
# in a row before they are detected as true motion. At the default of 1, all
# motion is detected. Valid range: 1 to thousands, recommended 1-5
minimum_motion_frames 1

# Specifies the number of pre-captured (buffered) pictures from before motion
# was detected that will be output at motion detection.
# Recommended range: 0 to 5 (default: 0)
# Do not use large values! Large values will cause Motion to skip video frames and
# cause unsmooth movies. To smooth movies use larger values of post_capture instead.
pre_capture 0

# Number of frames to capture after motion is no longer detected (default: 0)
post_capture 0

# Event Gap is the seconds of no motion detection that triggers the end of an event.
# An event is defined as a series of motion images taken within a short timeframe.
# Recommended value is 60 seconds (Default). The value -1 is allowed and disables
# events causing all Motion to be written to one single movie file and no pre_capture.
# If set to 0, motion is running in gapless mode. Movies don't have gaps anymore. An
# event ends right after no more motion is detected and post_capture is over.
event_gap 0

# Maximum length in seconds of a movie
# When value is exceeded a new movie file is created. (Default: 0 = infinite)
max_movie_time 0

# Always save images even if there was no motion (default: off)
emulate_motion off


############################################################
# Image File Output
############################################################

# Output 'normal' pictures when motion is detected (default: on)
# Valid values: on, off, first, best, center
# When set to 'first', only the first picture of an event is saved.
# Picture with most motion of an event is saved when set to 'best'.
# Picture with motion nearest center of picture is saved when set to 'center'.
# Can be used as preview shot for the corresponding movie.
output_pictures off

# Output pictures with only the pixels moving object (ghost images) (default: off)
output_debug_pictures off

# The quality (in percent) to be used by the jpeg compression (default: 75)
quality 80

# Type of output images
# Valid values: jpeg, ppm (default: jpeg)
picture_type jpeg

############################################################
# FFMPEG related options
# Film (movies) file output, and deinterlacing of the video input
# The options movie_filename and timelapse_filename are also used
# by the ffmpeg feature
############################################################

# Use ffmpeg to encode movies in realtime (default: off)
ffmpeg_output_movies off

# Use ffmpeg to make movies with only the pixels moving
# object (ghost images) (default: off)
ffmpeg_output_debug_movies off

# Use ffmpeg to encode a timelapse movie
# Default value 0 = off - else save frame every Nth second
ffmpeg_timelapse 0

# The file rollover mode of the timelapse video
# Valid values: hourly, daily (default), weekly-sunday, weekly-monday, monthly, manual
ffmpeg_timelapse_mode daily

# Bitrate to be used by the ffmpeg encoder (default: 400000)
# This option is ignored if ffmpeg_variable_bitrate is not 0 (disabled)
ffmpeg_bps 500000

# Enables and defines variable bitrate for the ffmpeg encoder.
# ffmpeg_bps is ignored if variable bitrate is enabled.
# Valid values: 0 (default) = fixed bitrate defined by ffmpeg_bps,
# or the range 2 - 31 where 2 means best quality and 31 is worst.
ffmpeg_variable_bitrate 0

# Codec to used by ffmpeg for the video compression.
# Timelapse mpegs are always made in mpeg1 format independent from this option.
# Supported formats are: mpeg1 (ffmpeg-0.4.8 only), mpeg4 (default), and msmpeg4.
# mpeg1 - gives you files with extension .mpg
# mpeg4 or msmpeg4 - gives you files with extension .avi
# msmpeg4 is recommended for use with Windows Media Player because
# it requires no installation of codec on the Windows client.
# swf - gives you a flash film with extension .swf
# flv - gives you a flash video with extension .flv
# ffv1 - FF video codec 1 for Lossless Encoding ( experimental )
# mov - QuickTime ( testing )
# ogg - Ogg/Theora ( testing )
ffmpeg_video_codec mpeg4

# Use ffmpeg to deinterlace video. Necessary if you use an analog camera
# and see horizontal combing on moving objects in video or pictures.
# (default: off)
ffmpeg_deinterlace off

############################################################
# SDL Window
############################################################

# Number of motion thread to show in SDL Window (default: 0 = disabled)
sdl_threadnr 0

############################################################
# External pipe to video encoder
# Replacement for FFMPEG builtin encoder for ffmpeg_output_movies only.
# The options movie_filename and timelapse_filename are also used
# by the ffmpeg feature
#############################################################

# Bool to enable or disable extpipe (default: off)
use_extpipe off

# External program (full path and opts) to pipe raw video to
# Generally, use '-' for STDIN...
;extpipe mencoder -demuxer rawvideo -rawvideo w=320:h=240:i420 -ovc x264 -x264encopts bframes=4:frameref$


############################################################
# Snapshots (Traditional Periodic Webcam File Output)
############################################################

# Make automated snapshot every N seconds (default: 0 = disabled)
snapshot_interval 0


############################################################
# Text Display
# %Y = year, %m = month, %d = date,
# %H = hour, %M = minute, %S = second, %T = HH:MM:SS,
# %v = event, %q = frame number, %t = thread (camera) number,
# %D = changed pixels, %N = noise level, \n = new line,
# %i and %J = width and height of motion area,
# %K and %L = X and Y coordinates of motion center
# %C = value defined by text_event - do not use with text_event!
# You can put quotation marks around the text to allow
# leading spaces
############################################################

# Locate and draw a box around the moving object.
# Valid values: on, off, preview (default: off)
# Set to 'preview' will only draw a box in preview_shot pictures.
locate_motion_mode off

# Set the look and style of the locate box if enabled.
# Valid values: box, redbox, cross, redcross (default: box)
# Set to 'box' will draw the traditional box.
# Set to 'redbox' will draw a red box.
# Set to 'cross' will draw a little cross to mark center.
# Set to 'redcross' will draw a little red cross to mark center.
locate_motion_style box

# Draws the timestamp using same options as C function strftime(3)
# Default: %Y-%m-%d\n%T = date in ISO format and time in 24 hour clock
# Text is placed in lower right corner
text_right %Y-%m-%d\n%T-%q

# Draw a user defined text on the images using same options as C function strftime(3)
# Default: Not defined = no text
# Text is placed in lower left corner
text_left CAMERA %t FrontDoor%\n7000 Grand Blvd%\nHouston,TX 77054

# Draw the number of changed pixed on the images (default: off)
# Will normally be set to off except when you setup and adjust the motion settings
# Text is placed in upper right corner
text_changes off

# This option defines the value of the special event conversion specifier %C
# You can use any conversion specifier in this option except %C. Date and time
# values are from the timestamp of the first image in the current event.
# Default: %Y%m%d%H%M%S
# The idea is that %C can be used filenames and text_left/right for creating
# a unique identifier for each event.
text_event %Y%m%d%H%M%S

# Draw characters at twice normal size on images. (default: off)
text_double on


# Text to include in a JPEG EXIF comment
# May be any text, including conversion specifiers.
# The EXIF timestamp is included independent of this text.
;exif_text %i%J/%K%L

############################################################
# Target Directories and filenames For Images And Films
# For the options snapshot_, picture_, movie_ and timelapse_filename
# you can use conversion specifiers
# %Y = year, %m = month, %d = date,
# %H = hour, %M = minute, %S = second,
# %v = event, %q = frame number, %t = thread (camera) number,
# %D = changed pixels, %N = noise level,
# %i and %J = width and height of motion area,
# %K and %L = X and Y coordinates of motion center
# %C = value defined by text_event
# Quotation marks round string are allowed.
############################################################

# Target base directory for pictures and films
# Recommended to use absolute path. (Default: current working directory)
target_dir /var/tmp

# File path for snapshots (jpeg or ppm) relative to target_dir
# Default: %v-%Y%m%d%H%M%S-snapshot
# Default value is equivalent to legacy oldlayout option
# For Motion 3.0 compatible mode choose: %Y/%m/%d/%H/%M/%S-snapshot
# File extension .jpg or .ppm is automatically added so do not include this.
# Note: A symbolic link called lastsnap.jpg created in the target_dir will always
# point to the latest snapshot, unless snapshot_filename is exactly 'lastsnap'
snapshot_filename %v-%Y%m%d%H%M%S-snapshot

# File path for motion triggered images (jpeg or ppm) relative to target_dir
# Default: %v-%Y%m%d%H%M%S-%q
# Default value is equivalent to legacy oldlayout option
# For Motion 3.0 compatible mode choose: %Y/%m/%d/%H/%M/%S-%q
# File extension .jpg or .ppm is automatically added so do not include this
# Set to 'preview' together with best-preview feature enables special naming
# convention for preview shots. See motion guide for details
picture_filename %v-%Y%m%d%H%M%S-%q

# File path for motion triggered ffmpeg films (movies) relative to target_dir
# Default: %v-%Y%m%d%H%M%S
# Default value is equivalent to legacy oldlayout option
# For Motion 3.0 compatible mode choose: %Y/%m/%d/%H%M%S
# File extension .mpg or .avi is automatically added so do not include this
# This option was previously called ffmpeg_filename
movie_filename %v-%Y%m%d%H%M%S

# File path for timelapse movies relative to target_dir
# Default: %Y%m%d-timelapse
# Default value is near equivalent to legacy oldlayout option
# For Motion 3.0 compatible mode choose: %Y/%m/%d-timelapse
# File extension .mpg is automatically added so do not include this
timelapse_filename %Y%m%d-timelapse
############################################################
# Global Network Options
############################################################
# Enable or disable IPV6 for http control and stream (default: off )
ipv6_enabled off

############################################################
# Live Stream Server
############################################################


complete file in motion.conf


#105
Raspberry Pi / Static IP on WLAN0
March 06, 2018, 04:27:08 PM
Add the following to the bottom of  /etc/dhcpcd.conf 

interface wlan0
static ip_address=192.168.0.34/255.255.255.0
static routers=192.168.1.1
static domain_name_servers=8.8.8.8 8.8.4.4

or

interface wlan0   or  eth0
static ip_address=192.168.0.34/24
static routers=192.168.1.1
static domain_name_servers=192.168.1.1 8.8.8.8 8.8.4.4
#106
You might have to unplug the network cable to login then put it back to preform.

netdom.exe resetpwd /s:<server> /ud:<user> /pd:*

<server> = a domain controller in the joined domain

<user> = DOMAIN\User format with rights to change the computer password

/pd: password you want to use.

Example:   netdom resetpwd  /s:Quartz /ud: administrator /pd: blusky123!

Step 1: Getting in
If you know the local admin password - great! just click Switch User and log in as .\administrator and your password ".\" replaces the computer name in case you dont know it.Unplug the network cable, disable wireless, then reboot the system. After reboot log in with you domain credentials and you should be able to get back in.

Step 2: Reestablishing Trust

Open PowerShell as administrator. Run this command sequence:
$credential = Get-Credential – (enter domain admin account when prompted)

Reset-ComputerMachinePassword -Server ClosestDomainControllerNameHere

Example:    Reset-ComputerMachinePassword -Server Quartz

and you are all set:)

Show domain controller          echo %LOGONSERVER%
lists all domain controllers             nltest /dclist:

#107
Windows Fixes / MS-SQL server 2008 Install
February 07, 2018, 11:52:55 AM
If you get "Cannot connect to PC-NAME\SQLEXPRESS. A network-related or instance-specific error occurred while establishing a connection to SQL Server. The server was not found or was not accessible. Verify that the instance name is correct and that SQL Server is configured to allow remote connections. "    You do not have the server component install or the server is not running


Please check the ServerName which you provided. It should match with the below shown Name in the UserName textbox, and that name should followed with \SQLEXPRESS:


(local)\SQLEXPRESS will work as well as .\SQLEXPRESS


Start your Local SQL Server Service

Start SQL Config Manager: Click Start -> Microsoft SQL Server 2008 R2 -> SQL Server Configuration Manager
Start SQL Services: Set the SQL Server (SQLEXPRESS) and SQL Server Browser services to automatic start mode. Right-click each service -> Properties -> Go into the Service Tab
This will ensure they start up again if you restart your computer. Please check to ensure the state is "Running" for both services.


Login and authenticate with your Local SQL Server

Now open up SQL Server Management Studio and click "Connect to Object Explorer" and select Server Name:
[Your PC name]\SQLEXPRESS

Example: 8540P-KL\SQLEXPRESS or (localhost)\SQLEXPRESS

To find your PC name: Right click My Computer -> Properties -> Computer Name tab

Alternative: Login using windows authentication: Using the user name [Your Domain]/[Your User Name]


Setup User Account

Create a new Login acct: In SQL Mgmt Studio -> Expand your local Server -> Security -> Right click on Logins -> New Login

Set Password settings on New User Account: Uncheck Enforce password policy, password expiration and user must change pw(Since this is local) Default database -> Your Database

Grant roles to New User Account: User Mapping Page -> Map to your db and grant db_owner role Status Page -> Grant Permission to connect and Enable Login


Setup Access Permissions/Settings for User

Enable all auth modes: Right click your Local Server -> Properties -> Security Tab -> Enable SQL Server and Windows Authentication Mode
Enable TCP/IP: Open SQL Server Configuration Manager -> SQL Server Network Configuration -> Protocols for SQLEXPRESS -> Enable TCP/IP
Restart SQL Server Service: You will have to restart the SQL Server(SQLEXPRESS) after enabling TCP/IP


Database Properties File for Spring Project

database.url=jdbc:jtds:sqlserver://[local PC Computer
name];instance=SQLEXPRESS;DatabaseName=[db name];

database.username=[Your user name] database.password=[Your password]

database.driverClassName=net.sourceforge.jtds.jdbc.Driver

#108
To create a text_left  new line to stack in camera feed use: %\n     example text_left CAMERA %t FrontDoor%\n0000 Grand Blvd%\nBryan,TX 77054  then it will result to   CAMERA 1
                FrontDoor
                0000 Grand Blvd
                Bryan,Tx 77054
#109
On a Apple Keyboard  hold the " option + R" to get the utilities menu.

On a microsoft Keyboard hold the " ALt " right after power up then to reload over the internet press the "windows key + R "
#110
Linux Fixes / How to Use symlink
December 28, 2017, 02:50:34 PM
Say var is the link your trying to make in another directory use the line below.
Path to where you put var is the original directory(Source).    "var"(Target) is the linked directory in the folder you want ,If the folder is already created it will put the sources path in the folder. You can delete the Target folder and it will create the Target folder name.

ln -s /path/to/where/you/put/var var
ln -s /mnt/bigdrive/Videos /var/www/html/vids    example - do not create the folder just put the folder name at the end of the symlink cmd to create the symlink name ( vids )
ln-s /mnt/bigdrive/Videos vids

Link to a windows share: mount -t cifs //server/share /mnt/abc -o user=user,pass=password,dom=domain
exapmle: mount -t cifs //192.168.2.1/C /mnt/Windows-C -o user=name_of_windows_user_account, pass=Windows_password

unlink [symlink to remove]
rm [symlink name]

Use crontab to start script at starup after reboot https://linuxhint.com/a-beginners-guide-to-crontab-on-centos/
#111
Windows Fixes / AutoLogon to Windows 10
December 06, 2017, 09:14:23 AM
Step 1: Open Registry Editor. To do so, type Regedit in the Start menu search box or Run command box and then press Enter key. Click Yes button when you see the UAC (User Account Control) box.


Step 2: In the Registry Editor, navigate to the following key:
HKEY_LOCAL_MACHINE\SOFTWARE\Microsoft\Windows NT\CurrentVersion\Winlogon


Step 3: On the right-side, look for the entry named DefaultUserName, double-click on it and make sure that your Microsoft account or local user account name is appearing under Value data box.


Step 4: Next, on the right-side again, look for the entry named DefaultPassword. If the entry doesn't exist, please create one by right-clicking on the empty space, clicking New and then clicking String Value. Rename it to DefaultPassword and enter your password in the Value data box. Click OK button.


Step 5: Finally, you need to enable automatic logon. To do so, on the right-side (once again), look for the entry labelled AutoAdminLogon and then change its value from 0 (zero) to 1 (one).


That's it! Restart your PC to see your Windows 10 automatically logging into your account without asking you to enter the password. Good luck!


#112
Windows Fixes / Clone Larger HDD to smaller SSD
November 13, 2017, 03:39:19 PM
Using Macrium Reflect ,you can also use Free MiniTool Partion Wizard 10.2
#113
Windows Fixes / Bootable USB to iso image
September 22, 2017, 08:59:37 PM
How to Convert a Bootable USB to an .iso File

Published 2015-02-03

Thanks to: https://forums.hak5.org/index.php?/topic/15567-convert-bootable-usb-to-iso/

Download and install ImgBurn. It's a free application, but be careful during installation that you don't install the 3rd party crap with it. Make sure you select "Custom" during each screen and deselect the crapware that tries to sneak in.

Plug the bootable stick into your machine.

Open the ImgBurn application.

Now click on the "Create image file from files / folders"


ImgBurn Main Screen

Next to the Sources pane, click on the Browse Folder button.

Browse Folder Button

Select the folder or drive you want to convert. In this instance I'm just imaging the D: drive.

Selecting D: Drive

Next, click on the Browse Folder button next to the Destination part.

Browse Folder Buttton

Select a location to store the .iso file, and the name for it. In this instance I'm saving it to C:\Temp\New Folder and naming it Image.

Setting Destination File

Click the Advanced tab, and then the Bootable Disc tab.


Check the Make Image Bootable checkbox, and click the Browse button next to Boot Image.


Browse to the Boot folder, and open the etfsboot.com file.


Set the Developer ID to Microsoft Corporation and the Sectors To Load to 8. Leave 07C0 in the Load Segment part.


Now click the big Build button on the bottom-left.


Because we didn't give the image a title, we get this error. Just click Yes to accept the default, or provide a name you desire.


And you'll receive a confirmation about what will happen next. Click OK. In my case, I actually had to go back to the advanced tab as well to permit making an image that exceeds the ISO standard size (Mine's over 10GB).


And then patiently wait...


And that's it! Enjoy your newly created .iso file.


#114
Raspberry Pi / To autostart a program at boot Raspberry PI
September 11, 2017, 12:00:57 PM
Put the cmd in the " /etc/rc.local "
for python use & just in case of a loop.  example:  sudo python /directory/to/use/File.py
#116
Connect Tracer 4210RN to Raspberry_Pi to display on webpage

http://www.rototron.info/raspberry-pi-solar-serial-rest-api-tutorial/
#117
Raspberry Pi / Get Solar Info From Raspberry_PI
August 14, 2017, 02:41:15 PM
Get Solar info from Ras_Pi

http://www.rototron.info/raspberry-pi-solar-serial-rest-api-tutorial/

put info in a iframe box  and have it update every five seconds. use code below for all browsers:


<script type="text/javascript">
   setInterval(refreshIframe, 5000);
   function refreshIframe() {
       var frame = document.getElementById("Frame");
       frame.src = frame.src;
   }
</script>

<iframe id="Frame" src="http://www.aspforums.net" frameborder="0"></iframe>

#119
General Discussion / Wire SonOff to light switch
July 12, 2017, 02:12:25 PM
All Credit to the SuperHouse 


 You may reach them at http://www.superhouse.tv

This for a US wire color code setup
#120
Copied from:  http://randomnerdtutorials.com/reprogram-sonoff-smart-switch-with-web-server/

Browse our projects by category

ESP8266
Arduino
Raspberry Pi
Home Automation
Sensor/Modules Guides

Make Arduino into FTDI programmer = Pin: GND + RST then connect the 3.3V, RX, TX, GND


Reprogram Sonoff Smart Switch with Web Server
25 Shares
In this post, you're going to learn how to flash custom firmware in the Sonoff device, so that you can control it with your own web server. I recommend that you read my previous post to get familiar with the Sonoff.

If you don't have a Sonoff yet, you can get one for $5 on eBay: http://ebay.to/2eNzHf2.

First, watch the step by step video tutorial below


Safety warning
Make sure you disconnect your Sonoff from mains voltage. Then, open the box enclosure.

warning-m

Sonoff pinout
RELATED CONTENT: Like ESP8266? Check out Home Automation Using ESP8266
The Sonoff is meant to be hacked, and you can see clearly that these connections were left out, so that you can solder some pins and upload a custom firmware. That's the pinout.


I've soldered 4 header pins, so that I can easily connect and disconnect wire cables to my Sonoff device.


Preparing your 3.3V FTDI module
You need an FTDI module to upload a new firmware to your Sonoff. Use the schematics provided as a reference.


DOWNLOAD FREE PDF: Getting Started with ESPlorer IDE and ESP8266
Warning: uploading a custom firmware is irreversible and you'll no longer be able to use the app eWeLink.

I've added a toggle switch in the power line, so that I can easily turn the Sonoff on and off to flash a new firmware without having to unplug the FTDI module.

I used hot glue to glue the ends of the wires together. This prevents you to make wrong connections between the FTDI and the Sonoff in the future.


Boot your Sonoff in Flashing Mode
To flash a new firmware to your Sonoff, you have to boot your Sonoff in flashing mode. Follow this 4 step process:

1) Connect your 3.3V FTDI programmer to your computer

2) Hold down the Sonoff button


3) Toggle the switch to apply power to the Sonoff circuit


4) Then, you can release the Sonoff button

Now, your Sonoff should be in flashing mode and you can upload a new firmware.

Opening the Arduino IDE
You should have the ESP8266 add-on installed in the Arduino IDE – If you don't have the add-on installed, first follow this tutorial on How to Install the ESP8266 Board in Arduino IDE.

You can upload the full sketch to your Sonoff (replace with your SSID and password):

/*********
  Rui Santos
  Complete project details at http://randomnerdtutorials.com 
*********/

#include <ESP8266WiFi.h>
#include <WiFiClient.h>
#include <ESP8266WebServer.h>
#include <ESP8266mDNS.h>

MDNSResponder mdns;

// Replace with your network credentials
const char* ssid = "YOUR_SSID";
const char* password = "YOUR_PASSWORD";

ESP8266WebServer server(80);

String webPage = "";

int gpio13Led = 13;
int gpio12Relay = 12;

void setup(void){
  webPage += "<h1>SONOFF Web Server</h1><p><a href=\"on\"><button>ON</button></a>&nbsp;<a href=\"off\"><button>OFF</button></a></p>"; 
  // preparing GPIOs
  pinMode(gpio13Led, OUTPUT);
  digitalWrite(gpio13Led, HIGH);
 
  pinMode(gpio12Relay, OUTPUT);
  digitalWrite(gpio12Relay, HIGH);

  Serial.begin(115200);
  delay(5000);
  WiFi.begin(ssid, password);
  Serial.println("");

  // Wait for connection
  while (WiFi.status() != WL_CONNECTED) {
    delay(500);
    Serial.print(".");
  }
  Serial.println("");
  Serial.print("Connected to ");
  Serial.println(ssid);
  Serial.print("IP address: ");
  Serial.println(WiFi.localIP());
 
  if (mdns.begin("esp8266", WiFi.localIP())) {
    Serial.println("MDNS responder started");
  }
 
  server.on("/", [](){
    server.send(200, "text/html", webPage);
  });
  server.on("/on", [](){
    server.send(200, "text/html", webPage);
    digitalWrite(gpio13Led, LOW);
    digitalWrite(gpio12Relay, HIGH);
    delay(1000);
  });
  server.on("/off", [](){
    server.send(200, "text/html", webPage);
    digitalWrite(gpio13Led, HIGH);
    digitalWrite(gpio12Relay, LOW);
    delay(1000);
  });
  server.begin();
  Serial.println("HTTP server started");
}

void loop(void){
  server.handleClient();
}


Preparing your Arduino IDE
Having your Sonoff device still in flashing mode.

1. Select your FTDI port number under the Tools> Port > COM14 (in my case)
2. Choose your ESP8266 board from Tools> Board > Generic ESP8266 Module
3. Press the Upload button


Wait a few seconds while the code is uploading. You should see a message saying "Done Uploading".

Troubleshooting
If you try to upload the sketch and it prompts the following error message:

warning: espcomm_sync failed
error: espcomm_open failed
Your Sonoff is not in flashing mode and you have to repeat the process described in section "Boot your Sonoff in flashing mode" described earlier in this guide.

Final circuit
After uploading the code, re-assemble your Sonoff. Be very careful with the mains voltage connections.

It's the exact same procedure as shown in the introductory guide.


ESP8266 IP Address
Open the Arduino serial monitor at a baud rate of 115200. Connect GPIO 0 of your ESP8266 to VCC and reset your board.

After a few seconds your IP address should appear. In my case it's 192.168.1.70.


Demonstration
For the final demonstration open any browser from a device that is connected to the same router that your Sonoff is. Then type the IP address and click Enter!


Now when you press the buttons in your web server you can control the Sonoff switch and any device that is connected to it.

Sonoff tutorials list:

Sonoff – $5 WiFi Wireless Smart Switch Introduction
How to Flash a Custom Firmware to Sonoff
Wrapping up
That's it for now, I hope you had fun learning about the Sonoff device. Make sure you subscribe to my blog, because I'll be posting more tutorials about the Sonoff.

Do you have any questions? Leave a comment down below!

Thanks for reading,

Rui