News:

The Latest electronic and computer Tips that work!

Main Menu
Menu

Show posts

This section allows you to view all posts made by this member. Note that you can only see posts made in areas you currently have access to.

Show posts Menu

Topics - branx86

#81
Windows Fixes / Remove arrows from Icon's win10
June 13, 2019, 05:24:40 PM
First open regedit
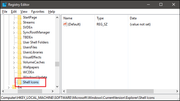
Then navigate    HKEY_LOCAL_MACHINE\SOFTWARE\Microsoft\Windows\CurrentVersion\Explorer

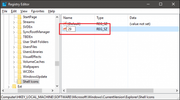
Next, you're going to create a new value inside the Shell Icons key. Right-click the Shell Icons folder icon and choose New > String Value. Name the new value 29.


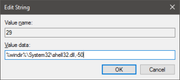
Now, you're going to modify that value. Double-click the new 29 value and type (or copy and paste) the following into the "Value data" box to remove arrows from shortcut icons:   %windir%\System32\shell32.dll,-50


To put the arrows back just Delete the 29 key.
#82
Arduino / Arduino 16x16 LED Sign
March 12, 2019, 09:34:10 PM
Use Arduino 1.0 to program  use the attachment to program ino and 16x16Scrolling Letters_Numbers to write messages.

IF you use Ardunio IDE 1.6.8
use settings:
      Board "Arduino/Genuino UNO"
      Programmer "AVRISP"
      Serial Monitor Baud Rate "9600"
#83


<script type="text/javascript">
   setInterval(refreshIframe, 5000);
   function refreshIframe() {
       var frame = document.getElementById("Frame");
       frame.src = frame.src;
   }
</script>

<iframe id="Frame" src="http://www.aspforums.net" frameborder="0"></iframe>

#84
Linux Fixes / Xibo install
December 31, 2018, 03:34:49 PM
st finished the install. Hope can save someone's time. Please fell free to modify, amend and comment.

Avoid using Chrome on install, it has strange problem.

Install CentOS minimum. I use CentOS-7.2.1511-x86_64 then update.

Install net-tools and editor if not using vi.
Disable /etc/sysconfig/selinux

sudo yum -y install httpd
sudo systemctl enable httpd
sudo firewall-cmd --permanent --add-port=80/tcp
sudo firewall-cmd --permanent --add-port=443/tcp
sudo firewall-cmd --reload

yum install -y epel-release
rpm -Uvh https://dl.fedoraproject.org/pub/epel/epel-release-latest-7.noarch.rpm 102

PHP 5.6
rpm -Uvh https://mirror.webtatic.com/yum/el7/webtatic-release.rpm 77

The following work for me.
yum install -y php56w php56w-opcache php56w-common
yum install -y php56w-pear php56w-devlop.x86_64
yum install -y php56w-devel php56w-intl php56w-soap php56w-mcrypt json
yum install -y php56w-pdo php56w-gd
yum install -y php56w-mysql
yum install -y php56w-mbstring

Install MariaDB
yum -y install mariadb-server
systemctl enable mariadb
systemctl start mariadb
mysql_secure_installation

Prepare compile zeromq
yum -y group install "Development Tools"

Download zeromq.
tar zxvf zeromq-4.2.0.tar.gz
./configure
make
make install
pecl install zmq-beta
edit /etc/php.ini and add extension=zmq.so 110

Extract cms to /var/www/xibo18.
Edit /etc/httpd/conf/httpd.conf change
DocumentRoot "/var/www/xibo18/web"
<Directory "/var/www/xibo18/web">
Options Indexes FollowSymLinks MultiViews
AllowOverride All
Order allow,deny
Allow from all
Require all granted

chown -R apache:apache /var/www/xibo18

XMR
/var/www/xibo18/vendor/bin/config.json
{
"listenOn": "tcp://ip_addr:50001",
"pubOn": ["tcp://ip_addr:9505"],
"debug": false
}

XTR
EDITOR=joe crontab -e
'* * * * * /usr/bin/php /var/www/xibo18/bin/xtr.php'

Edit /etc/php.ini
max_execution_time = 120
memory_limit = 256M
post_max_size = 256M
upload_max_filesize = 256M
extension=zmq.so 110
date.timezone = TIME_ZONE

systemctl restart httpd

http://IP_ADDR

Enjoy.
#85
Raspberry Pi / Upgrade raspberry Pi Distro
December 14, 2018, 08:44:36 PM
1 sudo apt update

2 sudo apt dist-upgrade

3 sudo apt clean

4 sudo reboot

5. Done
#86
Raspberry Pi / Show Boot text on bootup
December 14, 2018, 08:01:11 PM
Just edit the /boot/cmdline.txt file, and remove the quiet directive.

# cat /boot/cmdline.txt
#dwc_otg.lpm_enable=0 console=serial0,115200 console=tty1 root=PARTUUID=xxxxxxxx-yy rootfstype=ext4 elevator=deadline fsck.repair=yes rootwait quiet splash plymouth.ignore-serial-consoles

cp /boot/cmdline.txt ~/boot_cmdline_bak.txt
sudo nano /boot/cmdline.txt
#87
Windows Fixes / gpresult to find out all the members Of
December 03, 2018, 09:44:04 AM
gpresult/Z     to find out all the members Of  in AD
#88
General Discussion / Knock Apart Utility Table
November 15, 2018, 03:29:05 PM


This table is made from a full sheet of 5/8-in. plywood for the interlocking base stand and a sheet of 3/4-in. plywood for the work surface and shelves. You'll also need four 10-ft. lengths of 1×3 pine for the edge banding and cleats.

Cut two 30-in. high by 48-in. long pieces from the 5/8-in. plywood for the base pieces. Then cut a slightly oversize 5/8-in. wide slot in the bottom half of one base and in the top half of the other. Make both slots about 15-1/2 in. long. Assemble the base and position the top so the corners are aligned with the legs. Screw loose fitting 12-in. long 1x3s along each side of each leg to hold everything stable.

The table is much more stable if you use the 3/4-in. waste from the top to make triangular braces (which also act as shelves) with 20-in. long sides. Using 1-1/4 in. drywall screws, attach 1x2s to the base about 12 in. up from the floor and screw the shelves down.


#89
General Discussion / Cheap OSB WorkBench
November 13, 2018, 08:26:37 AM
Made from four 8'  2x4's
One 2x4,about6' long
Two large OSB  7/16"Thick 3"Deck Screws  1-5/8"Deck Screws
#90
Arduino / Arduino - Web-Based Joystick
November 01, 2018, 08:12:27 AM
https://create.arduino.cc/projecthub/iot_lover/arduino-web-based-joystick-02ca54?ref=platform&ref_id=424_trending___&offset=339

Components and supplies
1 - Arduino UNO or  Genuino UNO
1- WiFi Shield for Arduino
2- Servo Motors

Wiring

    Stack PHPoC WiFi shield or PHPoC Shield on Arduino

    Connect pin GND and VCC of two servo motors to GND and 5V of Arduino, respectively. (pin IOREF of arduino can be used like 5V pin)

    Connect pin signals of two servo motors to pin 8 and pin 9 of Arduino, respectively.

What We Need to Do

    Set Wifi information for PHPoC shield (SSID and password)

    Upload new UI to PHPoC shield

    Write Arduino code

Setting Wifi Information for PHPoC Shield

See this instruction. http://www.phpoc.com/support/manual/p4s-347_user_manual/contents.php?id=network_first_setup

Upload new Web UI to PHPoC Shield

    Download PHPoC source code remote_joystick.php (on code section).

    Upload it to PHPoC shield using PHPoC debugger  http://www.phpoc.com/common/download/software/PHPoCD.zip    according to this instructionhttp://www.phpoc.com/support/manual/phpoc_debugger_manual/contents.php?id=major_upload.

Write Arduino Code

    Install PHPoC library for Arduino on Arduino IDE (see the instruction ) http://www.phpoc.com/support/manual/p4s-347_user_manual/contents.php?id=library_setup

    See source code in code section.


Try it

    Click serial button on Arduino IDE to see the IP address.

    Open web browser, type http:// replace_ip_address/remote_joystick.php

    Click connect button and test it.


#93
Arduino / Arduino web led control
October 30, 2018, 02:42:03 PM
/*--------------------------------------------------------------
  Program:      eth_websrv_LED

  Description:  Arduino web server that serves up a web page
                allowing the user to control an LED
 
  Hardware:     - Arduino Uno and official Arduino Ethernet
                  shield. Should work with other Arduinos and
                  compatible Ethernet shields.
                - LED and resistor in series connected between
                  Arduino pin 2 and GND
               
  Software:     Developed using Arduino 1.0.3 software
                Should be compatible with Arduino 1.0 +
 
  References:   - WebServer example by David A. Mellis and
                  modified by Tom Igoe
                - Ethernet library documentation:
                  http://arduino.cc/en/Reference/Ethernet

  Date:         11 January 2013

  Author:       W.A. Smith, http://startingelectronics.org
--------------------------------------------------------------*/

#include <SPI.h>
#include <Ethernet.h>

// MAC address from Ethernet shield sticker under board
byte mac[] = { 0xDE, 0xAD, 0xBE, 0xEF, 0xFE, 0xED };
IPAddress ip(10, 0, 0, 20); // IP address, may need to change depending on network
EthernetServer server(80);  // create a server at port 80

String HTTP_req;          // stores the HTTP request
boolean LED_status = 0;   // state of LED, off by default

void setup()
{
    Ethernet.begin(mac, ip);  // initialize Ethernet device
    server.begin();           // start to listen for clients
    Serial.begin(9600);       // for diagnostics
    pinMode(2, OUTPUT);       // LED on pin 2
}

void loop()
{
    EthernetClient client = server.available();  // try to get client

    if (client) {  // got client?
        boolean currentLineIsBlank = true;
        while (client.connected()) {
            if (client.available()) {   // client data available to read
                char c = client.read(); // read 1 byte (character) from client
                HTTP_req += c;  // save the HTTP request 1 char at a time
                // last line of client request is blank and ends with \n
                // respond to client only after last line received
                if (c == '\n' && currentLineIsBlank) {
                    // send a standard http response header
                    client.println("HTTP/1.1 200 OK");
                    client.println("Content-Type: text/html");
                    client.println("Connection: close");
                    client.println();
                    // send web page
                    client.println("<!DOCTYPE html>");
                    client.println("<html>");
                    client.println("<head>");
                    client.println("<title>Arduino LED Control</title>");
                    client.println("</head>");
                    client.println("<body>");
                    client.println("<h1>LED</h1>");
                    client.println("<p>Click to switch LED on and off.</p>");
                    client.println("<form method=\"get\">");
                    ProcessCheckbox(client);
                    client.println("</form>");
                    client.println("</body>");
                    client.println("</html>");
                    Serial.print(HTTP_req);
                    HTTP_req = "";    // finished with request, empty string
                    break;
                }
                // every line of text received from the client ends with \r\n
                if (c == '\n') {
                    // last character on line of received text
                    // starting new line with next character read
                    currentLineIsBlank = true;
                }
                else if (c != '\r') {
                    // a text character was received from client
                    currentLineIsBlank = false;
                }
            } // end if (client.available())
        } // end while (client.connected())
        delay(1);      // give the web browser time to receive the data
        client.stop(); // close the connection
    } // end if (client)
}

// switch LED and send back HTML for LED checkbox
void ProcessCheckbox(EthernetClient cl)
{
    if (HTTP_req.indexOf("LED2=2") > -1) {  // see if checkbox was clicked
        // the checkbox was clicked, toggle the LED
        if (LED_status) {
            LED_status = 0;
        }
        else {
            LED_status = 1;
        }
    }
   
    if (LED_status) {    // switch LED on
        digitalWrite(2, HIGH);
        // checkbox is checked
        cl.println("<input type=\"checkbox\" name=\"LED2\" value=\"2\" \
        onclick=\"submit();\" checked>LED2");
    }
    else {              // switch LED off
        digitalWrite(2, LOW);
        // checkbox is unchecked
        cl.println("<input type=\"checkbox\" name=\"LED2\" value=\"2\" \
        onclick=\"submit();\">LED2");
    }
}

#95
Installing/Configuring PuTTy and Xming

Most of us connect to the CTM server via a PC running Windows, essentially making the PC a terminal. The PC interacts with the server through the X-windows system, forwarding the display from the server to the PC. Software must be installed on the PC to make this link work and the best software (so far) for this task is the PuTTy terminal emulator and the Xming X-window client.

PuTTy can be downloaded from http://www.chiark.greenend.org.uk/~sgtatham/putty/
Xming can be downloaded from http://sourceforge.net/project/downloading.php?group_id=156984&filename=Xming-6-9-0-31-setup.exe

Once PuTTy and Xming have been downloaded to the PC, install according to their respective instructions.

Configuring Xming
Once Xming is installed, run the application called 'XLaunch' and verify that the settings are as shown:


Save the configuration and close XLaunch

Configuring PuTTy
After installing PuTTy, double-click on the PuTTy icon on the desktop and configure as shown:


The most important setting is the X11 Forwarding. Without that set, the X-window system cannot find your PC for display. Save the configuration by typing a name (i.e. CTM) in the box under 'Saved Sessions' on the Sessions screen. Press the Save button to save the configuration. Click Open to open the terminal window or Cancel to close PuTTy.
The next time PuTTy is run, the session named CTM will be shown. Select CTM with the mouse and click Open to launch.


#96
Arduino / ESPDUINO Setup and Relay
September 26, 2018, 09:30:24 AM
ESPDUINO

Setup IDE use 1.6.8 2016/01/05
Preferences
Change the Additionl Boards Maagers URLs: http://arduino.esp8266.com/stable/package_esp8266com_index.json


Boardsettings


The Define pins in your Sketch use:
#define D0 2
#define D1 12
#define D2 3
#define D3 11
#define D4 4
#define D5 5

***********CH341SER Driver MUST be loaded to see the ESPDUINO*********


________Start of sketch that works with a single relay on pin D5=5 _____________________________________
/*
* ESP8266 (ESPDUINO) WiFi Relay Control
*
*Brandon Robertson
* brandon@cbrandon.com
*
*
*
*/


#include <ESP8266WiFi.h>
#define D5 5
const char* ssid = "ssid";
const char* password = "password";

int ledPin = D5;
WiFiServer server(80);

void setup() {
  Serial.begin(9600);
  delay(10);


  pinMode(ledPin, OUTPUT);
  digitalWrite(ledPin, LOW);

  // Connect to WiFi network
  Serial.println();
  Serial.println();
  Serial.print("Connecting to ");
  Serial.println(ssid);

  WiFi.begin(ssid, password);

  while (WiFi.status() != WL_CONNECTED) {
    delay(500);
    Serial.print(".");
  }
  Serial.println("");
  Serial.println("WiFi connected");

  // Start the server
  server.begin();
  Serial.println("Server started");

  // Print the IP address
  Serial.print("Use this URL : ");
  Serial.print("http://");
  Serial.print(WiFi.localIP());
  Serial.println("/");

}

void loop() {
  // Check if a client has connected
  WiFiClient client = server.available();
  if (!client) {
    return;
  }

  // Wait until the client sends some data
  Serial.println("new client");
  while(!client.available()){
    delay(1);
  }

  // Read the first line of the request
  String request = client.readStringUntil('\r');
  Serial.println(request);
  client.flush();

  // Match the request

  int value = LOW;
  if (request.indexOf("/LED=ON") != -1) {
    digitalWrite(ledPin, HIGH);
    value = HIGH;
  }
  if (request.indexOf("/LED=OFF") != -1){
    digitalWrite(ledPin, LOW);
    value = LOW;
  }


  // Return the response
  client.println("HTTP/1.1 200 OK");
  client.println("Content-Type: text/html");
  client.println(""); //  do not forget this one
  client.println("<!DOCTYPE HTML>");
  client.println("<html>");

  client.print("Led pin is now: ");

  if(value == HIGH) {
    client.print("On"); 
  } else {
    client.print("Off");
  }
  client.println("

");
  client.println("Click <a href=\"/LED=ON\">here</a> Turn relay ON
");
  client.println("Click <a href=\"/LED=OFF\">here</a> Turn relay OFF
");
  client.println("</html>");

  delay(1);
  Serial.println("Client disconnected");
  Serial.println("");

}
#97
Linux Fixes / Send Gmail Mail from Application
September 19, 2018, 07:20:35 PM
Installing a Mail Client

For this solution you'll need a throwaway Gmail account, as you are going to specify your Gmail password in a configuration file.

Start by installing the tools you'll be using to send emails:

sudo apt-get install ssmtp
sudo apt-get install mailutils
sudo apt-get install mpack

Next, run:

sudo nano /etc/ssmtp/ssmtp.conf

and ensure that file contains the following configuration parameters, making sure that  your Gmail account credentials are in place:

root=postmaster
mailhub=smtp.gmail.com:587
hostname=raspberrypi
AuthUser=yourgmailusername@gmail.com
AuthPass=yourgmailpassword
FromLineOverride=YES
UseSTARTTLS=YES

Finally send a test email with an attachment from the target_dir directory:

mpack -s "Test Email" [target_dir/filename] [recipientEmailAddress]

If this mail arrives you are good to go to the next step.
#98
General Discussion / Convert Media Using FFmpeg
September 19, 2018, 12:03:23 PM
.AVI VIDEO TO .MPG
ffmpeg –i – Shawshank_Redemption.avi  Shawshank_Redemption.mpg

ffmpeg -i video.flv video.mpeg

.MP4 to .WMV:
ffmpeg –i  – video_name.wmv final_video_name.mp4

.AVI to .FLV:
ffmpeg –i  – original_video.avi –f flv final_video.flv

PAL format

ffmpeg –i  –original_video.avi –target pal-svcd final_video.mpg

NTSC format:

ffmpeg –i  –original_video.avi –target ntsc-svcd final_video.mpg

You can use the command to copy the video in any format.
ffmpeg –i  –origine.mp4 –c:v copy –c:a copy –final.mkv


copy the audio of a video
ffmpeg –i  –origine.mp4 –vn –acodec copy audio.aac


display your media file details
ffmpeg -i video.mp4


convert input.mp4 video file to output.mp3 audio file
ffmpeg -i input.mp4 -vn -ab 320 output.mp3

ffmpeg -i input.mp4 -vn -ar 44100 -ac 2 -ab 320 -f mp3 output.mp3

    -vn – Indicates that we have disabled video recording in the output file.
    -ar – Set the audio frequency of the output file. The common values used are  22050, 44100, 48000 Hz.
    -ac – Set the number of audio channels.
    -ab – Indicates the audio bitrate.
    -f – Output file format. In our case, it's mp3 format.

compress audio files using -ab flag in order to save some disk space
ffmpeg -i input.mp3 -ab 128 output.mp3

The list of various available audio bitrates are:

    96kbps
    112kbps
    128kbps
    160kbps
    192kbps
    256kbps
    320kbps


convert the first 50 seconds of given video.mp4 file to video.avi format
ffmpeg -i input.mp4  -t 50 output.avi

split the large video files into multiple smaller parts
ffmpeg -i input.mp4 -t 00:00:30 -c copy part1.mp4 -ss 00:00:30 -codec copy part2.mp4

Create join.txt file that contains the exact paths of the files that you want to join. All files should be same format (same codec). The path name of all files should be mentioned one by one like below.

/home/sk/myvideos/part1.mp4
/home/sk/myvideos/part2.mp4
/home/sk/myvideos/part3.mp4
/home/sk/myvideos/part4.mp4

Now, join all files using command:

$ ffmpeg -f concat -i join.txt -c copy output.mp4

The above command will join part1.mp4, part2.mp4, part3.mp4, and part4,mp4 files into a single file called "output.mp4".


Play Video
ffplay video.mp4
Play Audio
ffplay audio.mp3
#99
powershell -File "%~dpn0.ps1" %*
#100

You need the -ExecutionPolicy parameter:

Powershell.exe -executionpolicy remotesigned -File  C:\Users\SE\Desktop\ps.ps1

Otherwise PowerShell considers the arguments a line to execute and while Set-ExecutionPolicy is a cmdlet, it has no -File parameter.